SharePoint Add-in using Angular2
In my last post I explained how we can create an SharePoint Add-in using Angular2 (beta version). But now Angular2 has been officially released and there are significant changes, so I thought I should work and create the SharePoint Add-in using Angular2 (version 2.1.0). Setting up the project for creating SharePoint Add-In using Angular 2 in Visual Studio is quite confusing, hence I’m writing a detailed step by step description. Also, point to be considered is, we will develop a SharePoint hosted Add-In targeted for SharePoint Online. The same may work for SharePoint 2013, though I haven’t tried to explore it.
-
Creating Add-In and removing unwanted files
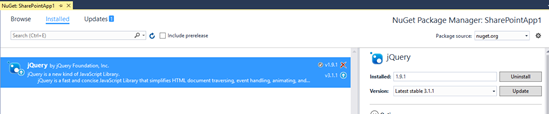
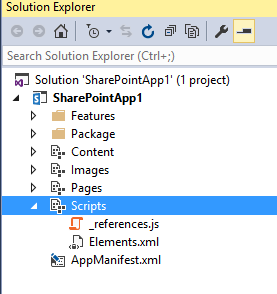
Create a SharePoint Add-In project in Visual Studio to be hosted as a SharePoint App targeted for SharePoint Online. If you have any problem in this please refer to my last post. Go to “Manage NuGet Package” and under the installed packages, remove the jQuery library. This will remove all jQuery scripts from the Scripts folder. Also remove “App.js” file from Scripts folder. Do remove jQuery reference from “Pages/Default.aspx” page (from all web pages, if there are).
After above steps, our ‘Scripts’ module will look like this:
-
Create configuration files
We need to create configuration files for Typescript, Typings and packages.
-
Create ‘tsconfig.json‘ file at the root of the application. It will tell Visual Studio how to transpile Typescript file into JavaScript file. Add following lines for Typescript configuration:
{ "compilerOptions": { "target": "es5", "module": "commonjs", "moduleResolution": "node", "sourceMap": true, "emitDecoratorMetadata": true, "experimentalDecorators": true, "removeComments": false, "noImplicitAny": true, "suppressImplicitAnyIndexErrors": true }, "exclude": [ "node_modules", "typings/main", "typings/main.d.ts" ] } -
We need to install some Typed Definition which not come with other libraries. Create ‘typings.json’
file at the root of the application and add following lines for typings configuration:{ "globalDependencies": { "core-js": "registry:dt/core-js#0.0.0+20160317120654", "jasmine": "registry:dt/jasmine#2.2.0+20160505161446", "node": "registry:dt/node#4.0.0+20160509154515" } } -
Create ‘package.json’ file at the root of the application. This file contains all the libraries and its dependencies. NPM will install all dependencies by looking into this file.
{ "name": "sharepointaddin-angular2", "version": "1.0.0", "description": "SharePoint Document Sharing and Tracking Addin", "scripts": { "start": "webpack-dev-server --inline --progress --port 8080", "test": "karma start", "build": "rimraf dist && webpack --config config/webpack.dev.js --progress --profile --bail", "postinstall": "typings install" }, "license": "MIT", "dependencies": { "@angular/common": "~2.1.0", "@angular/compiler": "~2.1.0", "@angular/core": "~2.1.0", "@angular/forms": "~2.1.0", "@angular/http": "~2.1.0", "@angular/platform-browser": "~2.1.0", "@angular/platform-browser-dynamic": "~2.1.0", "@angular/router": "~3.1.0", "@angular/upgrade": "~2.1.0", "bootstrap": "^3.3.7", "core-js": "^2.4.1", "reflect-metadata": "^0.1.8", "rxjs": "5.0.0-beta.12", "systemjs": "0.19.39", "zone.js": "^0.6.25" }, "devDependencies": { "css-loader": "^0.23.1", "extract-text-webpack-plugin": "^1.0.1", "file-loader": "^0.8.5", "gulp": "^3.9.1", "gulp-util": "^3.0.7", "html-loader": "^0.4.3", "html-webpack-plugin": "^2.15.0", "jasmine-core": "^2.4.1", "karma": "^0.13.22", "karma-jasmine": "^0.3.8", "karma-phantomjs-launcher": "^1.0.0", "karma-sourcemap-loader": "^0.3.7", "karma-webpack": "^1.7.0", "null-loader": "^0.1.1", "phantomjs-prebuilt": "^2.1.7", "raw-loader": "^0.5.1", "rimraf": "^2.5.2", "style-loader": "^0.13.1", "ts-loader": "^0.8.1", "typescript": "^1.8.9", "typings": "^1.0.4", "webpack": "^1.12.14", "webpack-dev-server": "^1.14.1", "webpack-merge": "^0.9.0" } } - After creation of these files, go to properties of these files (on right click, select properties) and select ‘NoDeployment’ for ‘Deployment Type‘.
-
-
Install Angular2 and all other packages
Open a command prompt and change the directory to the Visual Studio project path. Use below command to install all the packages as per above ‘package.json’.
npm install
-
Create structure
-
Create a new module name ‘app’ at the root of the application and all published files for our app will come here.
For this, you need to right click on your project in solution explorer and then select Add New Item. Select template ‘Module’ for Office/SharePoint. Name this module as ‘app’.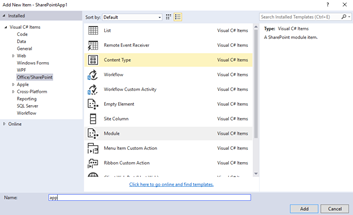
-
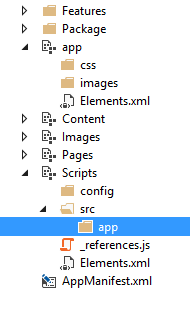
We will create two new folders (right click on ‘app’ and Add New Folder)
- css: CSS for the application.
- images: Images for the application.
-
Create two new folders in ‘Scripts’ folder.
- src: source files in angular2
- config: Webpack and other configuration for the application
- src: source files in angular2
- Create a new folder name ‘app’ in Scripts/src.
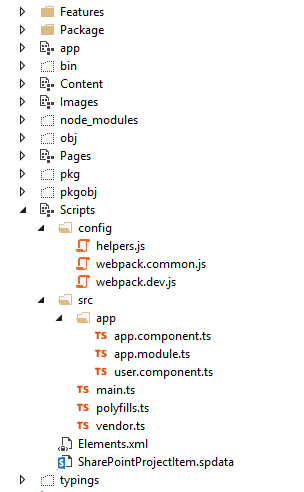
After above steps our application will look like this:
-
-
Add Source files
-
Create ‘Scripts\src\app\app.component.ts’
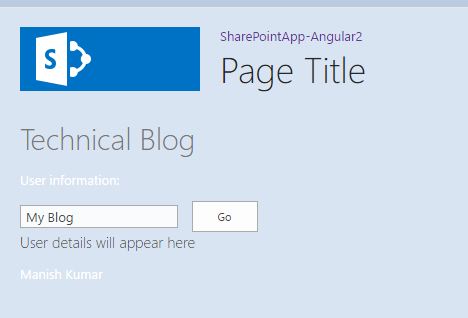
It is the root component of what will become a tree of nested components as the application evolves. We will bind few properties in html and also use second component ‘user.component’ in this.
import { Component } from '@angular/core';
import { NgModel } from '@angular/forms';

@Component({
    selector: 'my-app',
    template: '<h1>Technical Blog</h1>
    <p>User information:</p>
    <div><input type="text" [(ngModel)]="title" placeholder="Enter your name" id="txtName" name="txtName" />
    <button class="btn btn-primary" id="btnGo" (click)="buttonClick()">Go</button></div>
   <div><user-app>loading...</user-app></div>',
})
export class AppComponent {
    title: string;

    constructor() {
        this.title = "My Blog";
    }

    buttonClick(): void {
        alert("Button clicked");
        this.title = "Button clicked";
    }

}
If you want, you can create separate HTML file for template and replace the template with following:
templateUrl: <url of your template html file>
-
Create ‘Scripts\src\app\app.module.ts’
An Angular module class describes how the application parts fit together. Every application has at least one Angular module, the root module that you bootstrap to launch the application. You can call it anything you want.
This root module that tells Angular how to assemble the application. We are creating only this module for our app which solves our purpose. You can create multiple modules (feature and lazy) as per application requirement.
import { NgModule } from '@angular/core'; import { BrowserModule } from '@angular/platform-browser'; import { FormsModule } from '@angular/forms'; import { AppComponent } from './app.component'; import { UserComponent } from './user.component'; @NgModule({ imports: [BrowserModule, FormsModule], declarations: [AppComponent, UserComponent], bootstrap: [AppComponent] }) export class AppModule { } -
Create ‘Scripts\src\app\user.component.ts’
This is a separate component I have created to demonstrate how can we use one component in another component. We will use this component in our main component ‘app.component.ts’.
import { Component } from '@angular/core'; @Component({ selector: 'user-app', template: `<div><h3>User details will appear here</h3> <p>{{name}}</p> </div>` }) export class UserComponent { name: string; constructor() { this.name = "Manish Kumar"; } } -
Create ‘Scripts\src\main.ts’
Compiles the application with the JiT compiler and bootstraps the application to run in the browser. That’s a reasonable choice for the development of most projects.
import { platformBrowserDynamic } from '@angular/platform-browser-dynamic'; import { AppModule } from './app/app.module'; const platform = platformBrowserDynamic(); platform.bootstrapModule(AppModule); -
Create ‘Scripts\src\polyfills.ts’
Required polyfills by webpack for our app.
import 'core-js/es6'; import 'reflect-metadata'; require('zone.js/dist/zone'); if (process.env.ENV === 'production') { // Production } else { // Development Error['stackTraceLimit'] = Infinity; require('zone.js/dist/long-stack-trace-zone'); } -
Create ‘Scripts\src\vendor.ts’
All the angular files and other libraries should be mentioned here:
// Angular 2
import '@angular/platform-browser';
import '@angular/platform-browser-dynamic';
import '@angular/core';
import '@angular/common';
import '@angular/forms';
import '@angular/http';
import '@angular/router';

// RxJS
import 'rxjs';
-
-
Add Webpack configuration
Currently we installed all required libraries (as mentioned in our package.json file) using npm and it is installed under ‘node_modules’ folder. (If you are not able to find this folder in your app, click on ‘Show All files’ in Solution Explorer). If we see this folder there are lots of file and dependencies which are actually not required for our project directly and it is not a good practice to add all of these in our App. So we need to create some bundles which will contain all required files and our app will use these bundles directly.
To create these bundles we are using Webpack. Webpack is an open-source JavaScript module bundler. Webpack takes modules with dependencies and generates static assets representing those modules. It takes the dependencies and generates a dependency graph allowing you to use a modular approach for your web application development purposes.
We will create following bundle to serve our application:
- polyfills: Bundle all polyfills related Javascript to a single bundle.
- vendor: Bundle all third party Javascript (including Angular) to a single bundle.
- app: Bundle all JavaScript produced by transpiling the Typescript that we write.
-
Create ‘Scripts\config\helpers.js’
Helper functions for webpack configuration.
var path = require('path'); var _root = path.resolve(__dirname, '..'); function root(args) { args = Array.prototype.slice.call(arguments, 0); return path.join.apply(path, [_root].concat(args)); } exports.root = root; -
Create ‘Scripts\config\webpack.common.js’
We can have different configuration scripts for different environment (dev/test/production). But there are some common configuration and this script contains all the common configuration initializations.
var webpack = require('webpack'); var HtmlWebpackPlugin = require('html-webpack-plugin'); var ExtractTextPlugin = require('extract-text-webpack-plugin'); var helpers = require('./helpers'); module.exports = { entry: { 'polyfills': './Scripts/src/polyfills.ts', 'vendor': './Scripts/src/vendor.ts', 'app': './Scripts/src/main.ts' }, resolve: { extensions: ['', '.js', '.ts'] }, module: { loaders: [ { test: /\.ts$/, loader: 'ts' }, { test: /\.html$/, loader: 'html' }, { test: /\.(png|jpe?g|gif|svg|woff|woff2|ttf|eot|ico)$/, loader: 'file?name=/assets/[name].[hash].[ext]' }, { test: /\.css$/, exclude: helpers.root('Scripts/src', '../app'), loader: ExtractTextPlugin.extract('style', 'css?sourceMap') }, { test: /\.css$/, include: helpers.root('Scripts/src', '../app'), loader: 'raw' } ] }, plugins: [ new webpack.optimize.CommonsChunkPlugin({ name: ['app', 'vendor', 'polyfills'] }) ] }; -
Create ‘Scripts\config\webpack.dev.js’
This script contains configuration specific to our dev environment.
var webpack = require('webpack'); var webpackMerge = require('webpack-merge'); var ExtractTextPlugin = require('extract-text-webpack-plugin'); var commonConfig = require('./webpack.common.js'); var helpers = require('./helpers'); module.exports = webpackMerge(commonConfig, { devtool: 'source-map', output: { path: helpers.root('../app'), publicPath: '/SharePointApp-Angular2/app', filename: '[name].js', chunkFilename: '[id].chunk.js' }, htmlLoader: { minimize: false // workaround for ng2 }, plugins: [ new ExtractTextPlugin('[name].css') ], }); -
Create ‘webpack.config.js’
We need to add main configuration file for webpack at the root of the application. Webpack by default read this file for all configuration. Here we will point all configuration for our dev environment configuration. We need to change it for production environment before moving to production.
module.exports = require('./Scripts/config/webpack.dev.js'); -
Install webpack and create bundles
We need to install webpack globally (if it is not installed on your development server).
Execute following command from command prompt/terminal/powershell:
npm install –g webpack
-
Add bundles into application
By default, bundles created (as mentioned in the above step) in app module/directory not included in the project. We need to include them manually. If these files are not visible, enable “Show All Files” or refresh the project (of “Show All Files” is already enabled). Select bundle files, right click on them and then click on “Include In Project“.
After this we need to add references of these files in Default.aspx file (File which is a web form for your app).
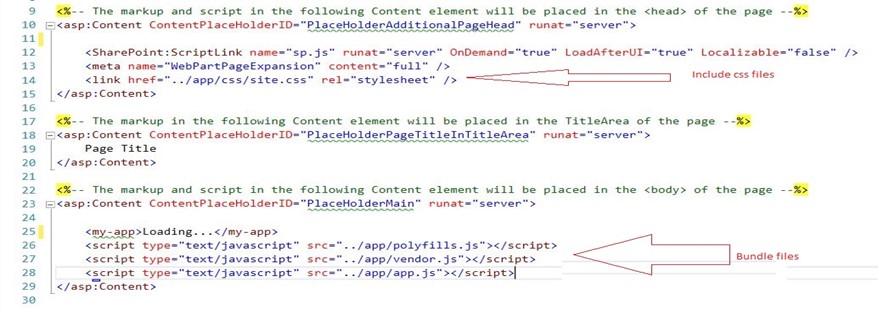
After this our application will look like this:
After successfully installation of Webpack we need to create required bundles for our application. Execute following command and this will create bundles in ‘/app‘ module/directory of our application.
webpack –config .\webpack.config.js –progress

Deploy the app and see the result in web browser.
[…] have created a new post which explains how to use latest version of Angular2 (v2.1.0) in SharePoint […]
Hello thank you so much for your valuable article; could you please give a link of the project to download cause I did exactly what you wrote but getting typings errors… 🙁
Hi BARS,
You can download project from here: https://github.com/maniishkumar/SharePointApp-Angular2
You are great man! That was my bad…
by the way if you change ts files you need to call the command webpack –config .\webpack.config.js –progress mentioned earlier on order webpack to create contents again…